Wednesday, November 24, 2010
Rear End Cap Out!
Tuesday, October 26, 2010
2 1/2 Days Journey - A trip to P&S Trailer in Ohio
More trailers awaiting various repairs, or possible sale. P&S also sells pre-owned Airstreams.
1578 miles (round trip), 2.5 days, 6 states (should have been 5, but Michigan got thrown in for good measure, by accident), 13.4 MPG with the trailer on the way to Ohio, and 18.4 MPG without the trailer on the way back to Minnesota, and we managed to talk, plan and laugh the whole time. Thanks again to Brad for joining me on this trip. As for the Excella, I can't wait to see her again next Spring, with new clear coat, awnings, Fantastic Fans, new power supply, new tires, and a extensive but minor list of other items.
So May will move into her 6 month "winter" shop on November 1st. I am way pumped up and ready to get to work! Until next time.....
Tuesday, October 12, 2010
Work on May will soon begin again!
Please wonder no longer as to what May has been doing all summer. She has been on vacation! About the only thing that I worked on all summer was the few minutes it took to remove this flag box from underneath her. Note the box was open to the front, and you can see all the dirt and squirrel nuts that accumulated towards the back of the box. I am not saving this box as it really has no historical significance for me, and I will use retractable flag poles when I get that far along, so no pole box required.
I was very lucky in one regard this summer. I decided that I did not like working on May while I am at the Airstream Park, so I brought her home around June 1st. Since she had to sit on the front, south facing, black top driveway, I found very few days that were conducive to actually working on her. It was just plain too hot. I tried working on some rivets on the back tail lights, but decided the only right way to finish that project is to buck rivet. So there she sat in the driveway, with me feeling slightly guilty for not getting any work done. And then August 13th came along. The Airstream Park was hit by a MAJOR, and I mean major, hail storm! Many, many trailers were totalled. Our '90 sustained $18,800 in damage! I know of one trailer that sustained over $35,000 in damage! But were was May? She was safe in my driveway at home, no hail dents. Watch this blog for some pictures and text from a soon upcoming trip to P&S in Ohio.
I have decided working on any trailer in the outdoor elements is just about impossible for me. I have no Sun shade, and no way to duck the elements. My hats off to all the people that have restored Airstreams while being 100% out of doors. Again this year, I have rented a shop to work on May, this time for 6 months starting on November 1st. It is a very nice shop, only 12 miles from my house. And this year I will have company! Buddy Brad is joining me in the shop rental, and Holly, his 1957 Overlander will be working side by side with May! I am very jazzed! I covered Brad's acquisition from Doug (Tinman54) this past February. You can find Holly's thread on the Airforums here. We will be out of the Minnesota Winter elements, heated, with plenty of space.
I am off for now, but will soon have road trip pictures on the way to and from P&S in Ohio, and May restoration pictures once I get under cover again in a little more than 2 weeks! Until then....
Wednesday, May 5, 2010
Back to the outside
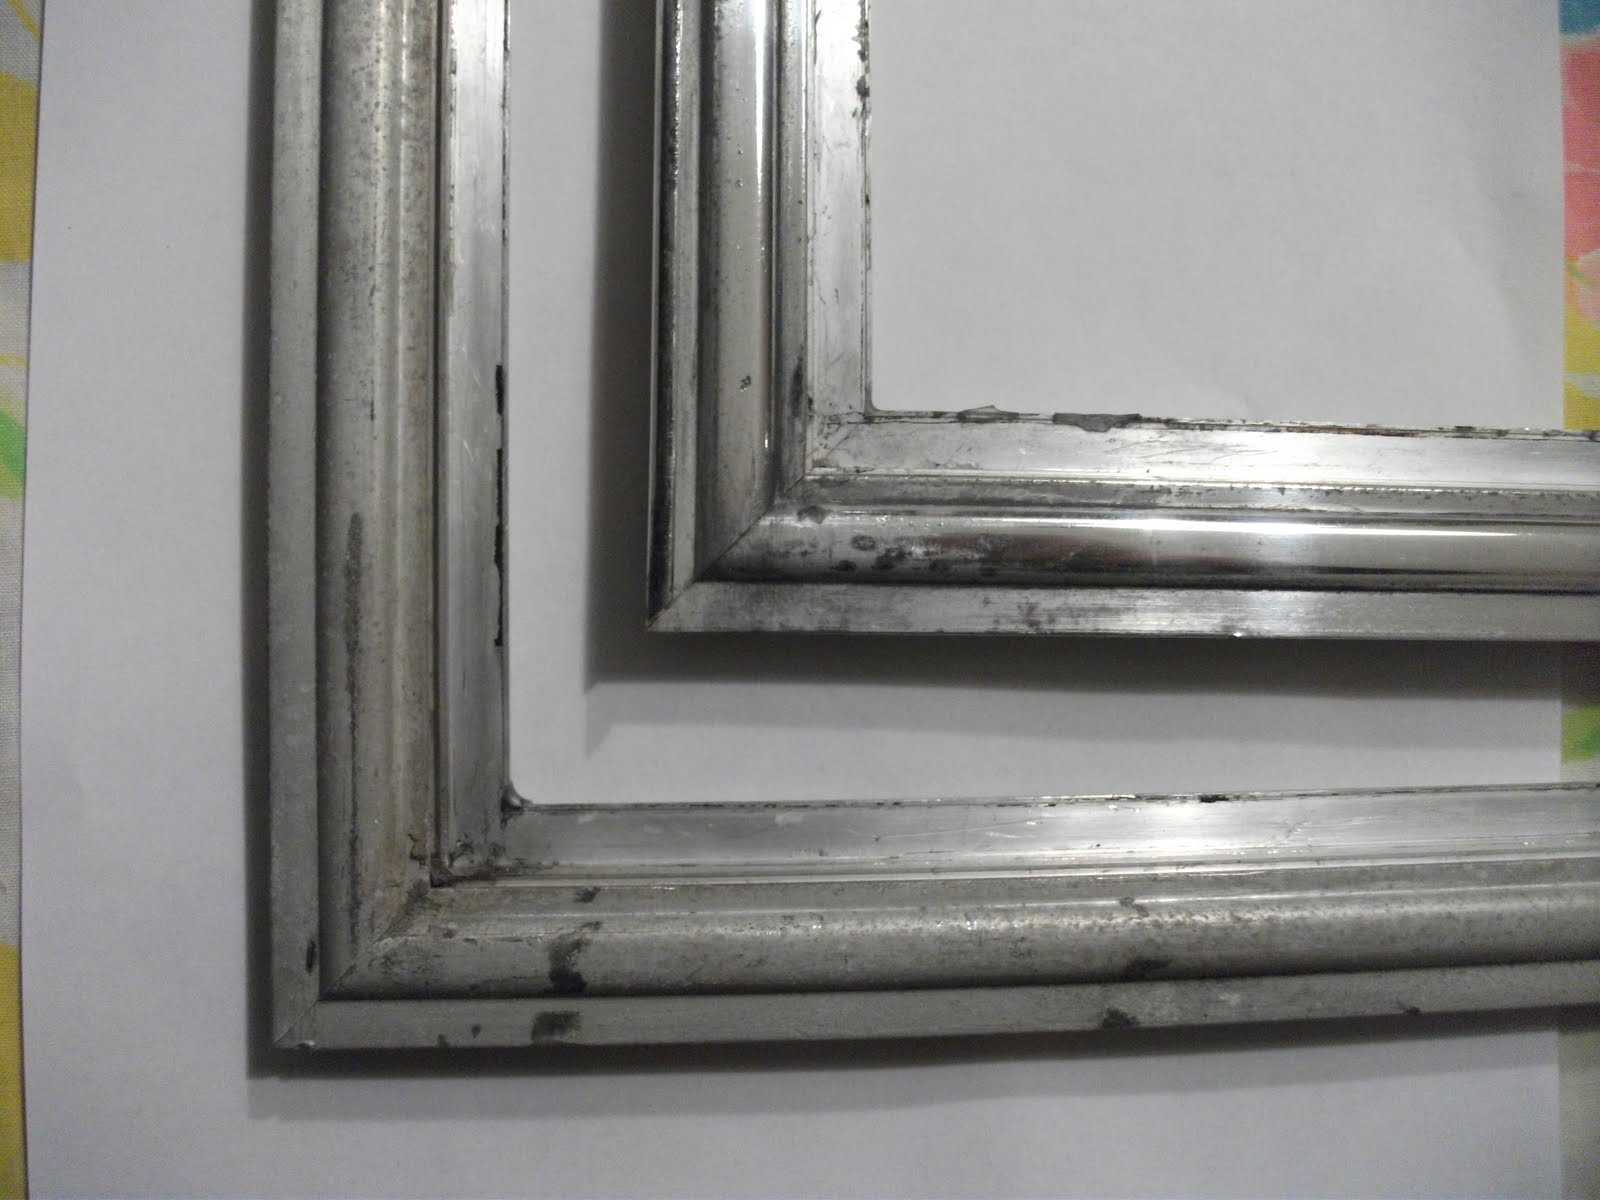
I have not been able to get too much work done since the move outside, but last weekend I did manage to take on the final stages of fabrication for the rear running lights. I am installing the tear drop lights that would have been the factory option in '64. I could not just install the lights, as a PO had installed oblong running lights, and this left screw holes wider than what the tear drop light could cover. Airstream installed the wiring even when the lights were not originally installed at the factory, and that is what happened with May, with the PO installing oblong running lights (my guess in the 70's). My solution is the aluminum "bezel" that I custom cut to match the shape of the teardrops. You can see what the pre-rivet completion looks like above. Thanks to buddy Dave who helped me fabricate and sand the edges on his belt sander.
I also tackled the mess under the rear drip cap that I removed. Please note that a heat gun, Acetone and Mineral Spirits are your friends. The drip cap was not original to the trailer, and the PO had drilled right through the Airstream nameplate. I had to contend with really thick Vulkem underneath the cap, clear coat that had not been removed, and then I polished it all. I also realized that I did not have the correct sized pop rivets for the nameplate, so they are now ordered, and on their way from Vintage Trailer supply. I will also plug the holes from the drip cap with stainless pop rivets (see below).
Sunday, March 28, 2010
Lights and Windows-Ready to Move Again
Although I am unpublished these past 5 weekends, I can assure you I worked half of them, with some weekday window rebuilding time thrown in for good measure. I lost two weekends to the annual winter trip to Cozumel, Mexico (hey wait, what does that have to do with anything?) My main goal since late February was to get the turn signal, brake lights, and trailer brakes up and running. I also wanted to get the front and back windows rebuilt and installed, so my shell was relatively intact again, and ready for the move out doors again in early April. Well, this is no April Fool's joke, I am all done! So although the following pictures work backwards, here are the shots that help tell the story of this past month plus..
Note in the picture above the rear LED turn/stop lights installed. I will cover the lighting in a later post. Below is the front window from the inside, new glass installed, new cranks installed, looking in the end like the easy task it was not.
Here is a closer up view of the new cranks installed from Vintage Trailer. I also installed new nylon guides as well.
Exterior of the front window, partially open using the new cranks. I installed new custom cut tempered glass (1/8"). Glass RULES over Plexiglas! I am very glad Frank of Frank's Trailer works made a comment to me about glass over Plexi, and I am very happy with the final results.
This is the inside corner of the front window frame AFTER I had ground out the aluminum weld or slag that ran into the corners where the glass needs to lay flat. You see, I had the window all rebuilt the first time, and during installation, the frame broke apart in one corner. Four letter words still hover in the building where I worked on May this winter! The window frames had been rebuilt and welded at some point by a PO, but the welding was sub par. So back out the window comes, I pulled out all the glazing that was a major b&*$% to get in, and then found a welder. He used the aluminum weld that was already there, but along with getting much better welds into the joints, I ended up with a grinding project. Again, the below is after I ground out the slag, and you can see that I lost some of the corner as a result of the hot weld. I can assure you the frame is now very solid.
The below is what I started with BEFORE I ground out the corner slag from frames. I used a Dremel and many grinding wheels! I actually think this shot is from the back of the frame, and you can see the strength of the weld. The front window was also bigger than the rear, and I can see and understand the design flaw in the original corner strength of this front window frame.
The below is the rear Airstream Name Plate after I cleaned and re-painted. I learned a trick or two that will make the next one go faster. This is the rear name plate, clecoed and ready to be riveted again.

From polishing the window frames while at my kitchen table, the tools of the trade.

The rear Airstream sign un-installed, as well as the non-factory extra water drip cap. What a vulkum mess!
The rear and front window frames. Once polished, one not. This is BEFORE I broke the front window frame, so the inside corners on both still look original. Go back again to the frame above that I had to grind after welding, and you'll see that I list some corner material, but no biggy.
From polishing the window frames while at my kitchen table, the tools of the trade.
The rear Airstream sign un-installed, as well as the non-factory extra water drip cap. What a vulkum mess!
Monday, February 22, 2010
Pop Rivets and Screws
Below is the water heater shroud screwed back in place. I used 3/4" RV clay tape between the trailer body and shroud, as the shroud does not lay completely flush against the trailer, so the clay tape fills the void. Later this year when I pull out the front and rear window frames to re-caulk them, I will also use the clay tape. Water does not penetrate it, and it will be easier to finish caulk the seam between window frame and trailer. The clay tape that I took off the shroud from 1964 was still pliable. The floor around the water heater is in really good shape, so the clay tape stood up all those years against the elements, with near zero water leaks.
Below is the new Kitchen Vent cover installed. In comparison I am holding the old brittle, broken and faded original cover. The new vent cover is a little longer, but it still fits in, and I think it looks great. I copied all the original screw holes except the bottom two, accounting for the length difference of the new cover. This vent cover came from Vintage Trailer Supply.
I also ordered the glass for the front and back windows last Friday. Hopefully it will come in this week. More on that when I install them.
The truck to trailer wiring issue that I have been having since last fall is about to drive me nuts. I wasted the better part of my Sunday morning work hours trying to get the existing wiring to work with the newly installed 7 pin connector. I obviously have an incorrect ground somewhere in the old wiring, but I am going to put the old wiring issue on hold for now. When I pull up the floor and interior walls, I should be visually able to find the problem. For now I am going to run three temporary 14 gauge wires for my turn signals and running lights, and I will hook up my new LED turn/stop lights. I am going to bypass the trailer wiring for now entirely. This weekend I will see if the old brake wiring is good, as I really want to use the brand new brakes that came with the new axle that I had Hart RV install last fall. With the turn signals and possibly the brakes, I will be good to go for the next few months.
Well, I hope to be at it again this weekend. Until next time! -Tim
Monday, February 15, 2010
Plugging some holes, creating others.
The below picture is after I have taken out the back window, removed the drip cap, and then I was attempting to pull off the nameplate. I need to get a heat gun before I proceed any further. I will work on new window glass and gaskets this week. Then I can re-install with new openers.
Subscribe to:
Comments (Atom)